The Texecom Premier Elite series of alarms can be programmed using Windows software called Wintex. This makes setting up these alarms far easier than using the keypad menus – they have hundreds of options and settings.
Texecom sell two products to connect to these alarms using Wintex – PC-COM (a serial port adapter ~£20) and USB-COM (a USB to serial adapter ~£35) . I strongly suspected these were just serial TTL converters, but I was concerned that there might be some jiggery pokery stopping this from working. Some software requires very specific VID (vendor ID) and PID (product IDs) on the USB device. Some software uses custom drivers. Others use microcontrollers and obfuscation to make sure you buy the genuine product.
As an avid hardware hacker, I have a lot of USB to TTL serial converters. The most useful (and reliable, in terms of drivers) are FTDI cables based on the FT232R chips. Genuine cables are ~£14, breakout boards can be as low as £2 on eBay. So let’s try and get connected to the Premier Elite 12-W using this cable.
There are two ports on the Premier Elite board – Com Port 1 and Com Port 2. These are 5 pin Molex connectors with only 4 pins populated. There didn’t seem to be a direct pin-out in the manual, so from the manual and with a multimeter we have:
Pin 1 – 12V
Pin 2 – nothing
Pin 3 – GND
Pin 4 – Receive
Pin 5 – Transmit
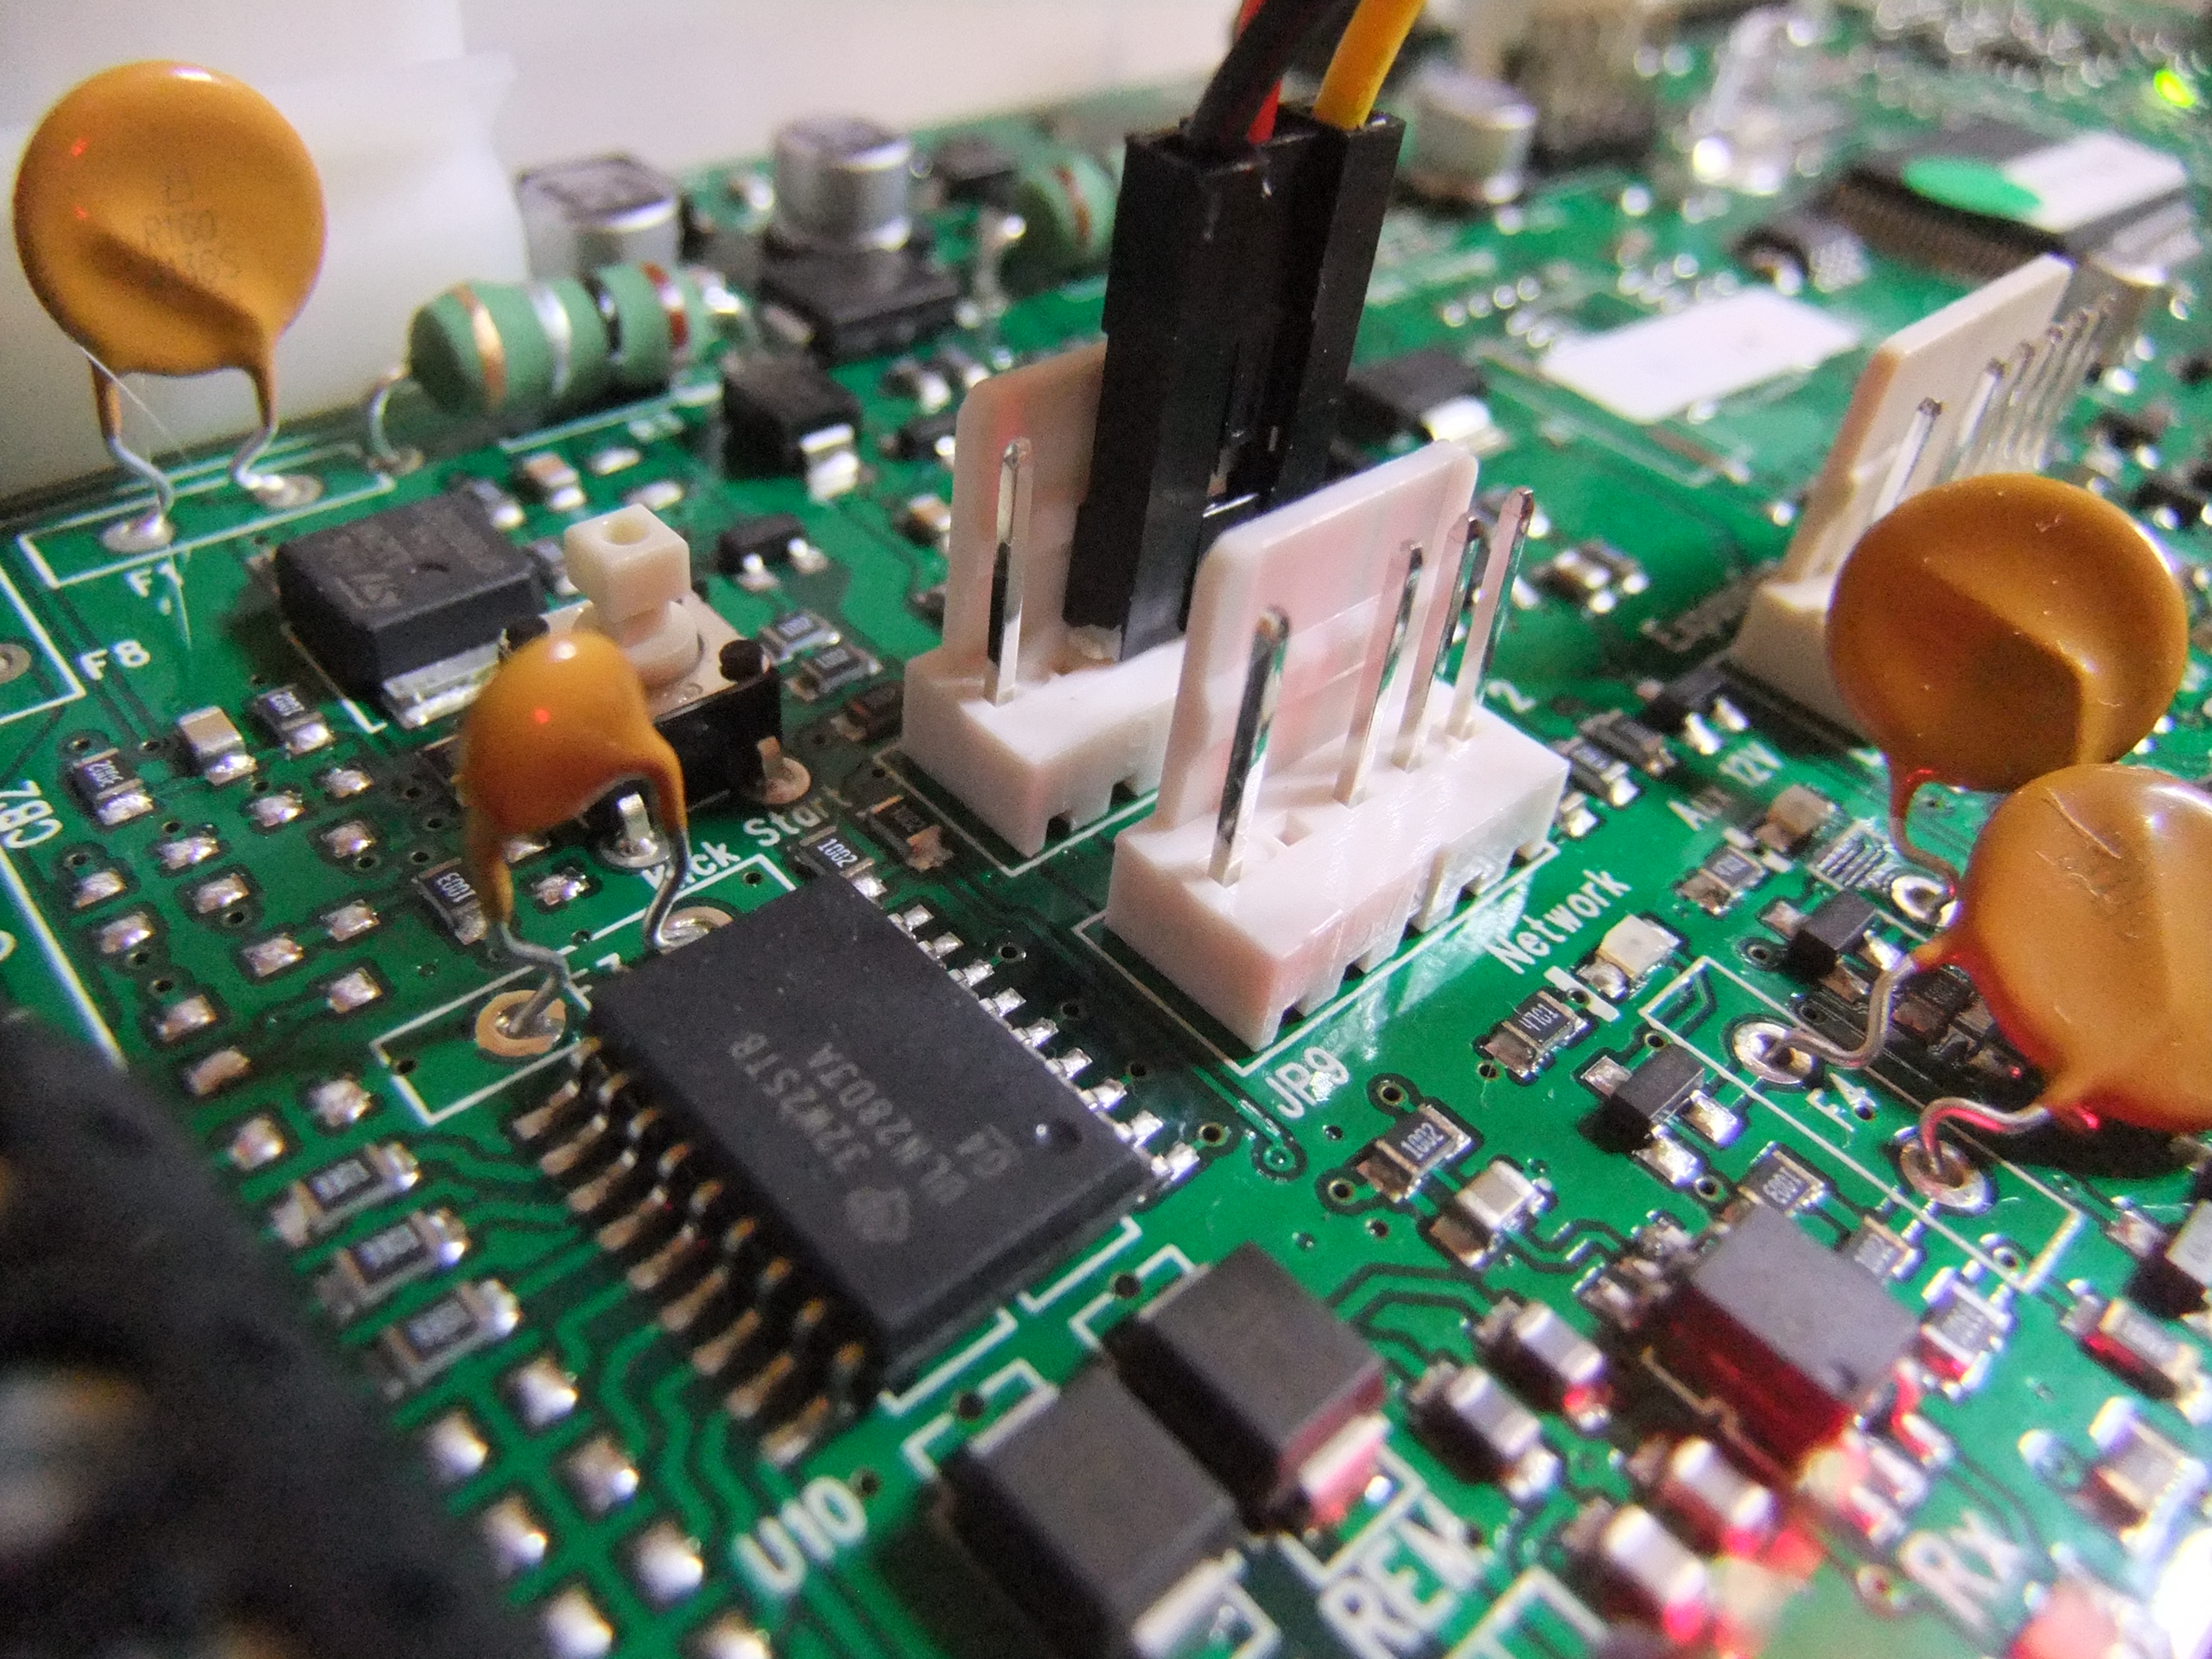
Com port 1 and 2
Signalling appears to be 5V. So, get out the 5V FTDI cable (they come in different voltages):

A 5V FTDI cable
Pin 1 – GND
Pin 2 – Don’t care
Pin 3 – Don’t care
Pin 4 – Transmit
Pin 5 – Receive
Pin 6 – Don’t care
We then need to connect transmit to receive, receive to transmit, and common ground. This terminology might be at odds with alarm equipment – RS485 buses often label one wire “T” and it means transmit on the master, receive on the slave. I suspect this simplifies wiring as you just connect all “T” wires.
So, to connect the two:
Texecom – FTDI
Pin 3 GND – Pin 1 GND
Pin 4 Receive – Pin 4 Transmit
Pin 5 Transmit – Pin 5 Receive
Just be cautious of the 12V on pin 1 of the alarm board – sending this up the chuff of your PC will result in damage.

Using jumper cables, you could make up a proper cable
Find out which COM port the FTDI cable is using (generally go into Device Manager, and it will be listed there).

COM6 is my FTDI cable
Go into Wintex and change the PC-COM port to this COM port:
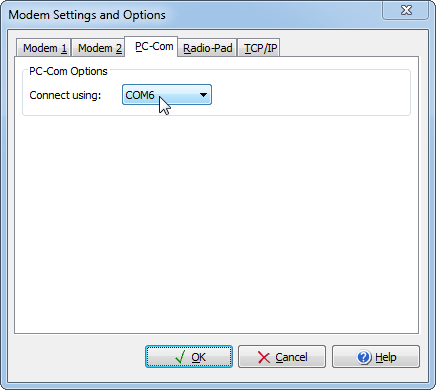
Change Wintex to use COM6
Connect, receive settings, change settings, and monitor Ricochet devices to your heart’s content!
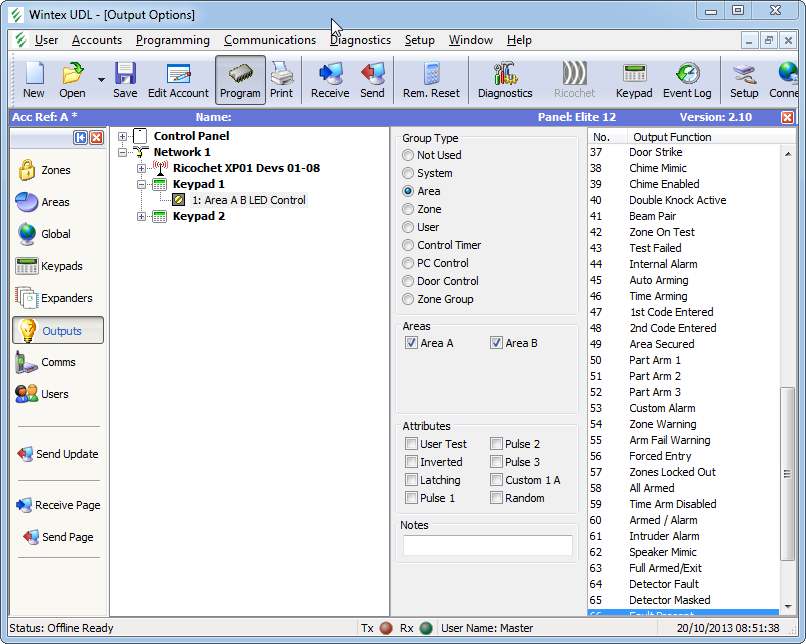
And start setting things up
Martin Collett
February 8, 2014 at 10:08amThanks for this great post! I wasted an awful lot of time trying to connect to my Premiere Elite 48 panel using a brand new but what turned out to be faulty Texecom USB cable. I knocked up my own using an FT232R cables and it connected first time. My cable is 3.3V not 5V and connection seems to be fine.
Thanks again, Martin
cybergibbons
February 15, 2014 at 11:05amGlad it helped – it’s much cheaper like this.
stormin
April 4, 2014 at 9:21amHi,, great post ,, Could you by any chance send me a diagram or message o f how you did it…I can buy a ttl to usb for £4 to comnnect my laptop to a texecom 12-w control panel but don, t want to blow anything…much appreciated stomin
8765
February 23, 2014 at 10:34pmCan you tell me what is the protocol (what data are exchanged during login process)? What is the baud rate? I have original cable and also made one like yours but with both I get error. Maybe this panel is locked and factory restore does not help. Is the alarm (bell) output 12V at startup? I do not have keypad, only naked board and wanted to talk to it only with rs232
cybergibbons
March 26, 2014 at 1:59pmI haven’t actually done much investigation here. It looks encoded at the minimum, potentially encrypted.
stormin
April 8, 2014 at 9:06amtop top man just read your post,,,exxxx.
just bought a usb to ttl and will try this ..
many thanks for taking the time to do this post…
I have been looking on ebay for a week now and the price they are charging for the
texecom downlod cable is an insult ..
thx Stormin
stomin
April 13, 2014 at 10:23amSorry to dissapoint anyone but this will only download upload to the premier 24 upwards.
It will not work with the 12-w panel. ,,,Stormin
M Hopkins
June 20, 2014 at 9:07amThanks for this post! I went ahead and ordered this from ebay
http://www.ebay.co.uk/itm/331223769283?ssPageName=STRK:MEWNX:IT&_trksid=p3984.m1497.l2649
If you scroll down that page it gives the colour codes but they are different
to your lead. Will my lead work if I make sure that GND, TX & RX plug onto the
correct pins regardless of colour?
Thanks in advance.
Arvind
September 19, 2014 at 6:28pmThanks for the post very informative. Can you may assist with my issue in that I have been trying to set up my PC to work on the Wintex software but will only work on COM 2. As COM 2 is already used for the GSM signalling( and this also will only work on COM2) I seem to be stuck. I have followed the set up and have “nothing fitted” in the COM1 set up. Any advice would be appreciated.
Arvind
James
February 23, 2015 at 11:27pmThis is very interesting. The price of the real Texecom USB-COM is as nothing compared to what they are charging for the the ethernet adapter – £102! And all it seems to do is translate ethernet frames back into serial again.
Don’t wish to seem ignorant, but is a USB-TTL adapter the same as a USB-Serial adapter? I have several USB to RS232 cables which are spare – could I use the TXD / RXD pins on this or is it something entirely different?
cybergibbons
March 28, 2015 at 10:43pmThe Ethernet adapter actually does a fair bit, though I’m sure a clone could be made cheaper.
USB-TLL and USB-Serial are the same.
James
March 29, 2015 at 6:06pmThanks for that – will proceed!
I’m reliably informed that if you connect up to a computer with a USB lead and run ser2net:
http://ser2net.sourceforge.net/
Then you can pass the serial communication into ethernet frames and off to any destination you like. You could use a Raspberry PI or similar for this and it would be a quarter of the price of the COM-IP. I’ve not tried this (alarm still not installed) but I will once it is up and running.
Thanks for the site!
Sean
August 24, 2020 at 5:55pmWow I’m in here looking for this solution 5 years later. Thanks all for the knowledge sharing!
Great Post
COM-USB alternative – DIY and cheap! | Universal Discovery Methodology
April 7, 2015 at 8:34pm[…] http://cybergibbons.com/alarms-2/programming-a-texecom-premier-elite-12-w-using-a-ftdi-cable/ […]
James
April 16, 2015 at 9:22pmI’ve now done this and have an equivalent to the COM-IP for effectively no cost.
Details here – https://gw0udm.wordpress.com/
I’d be interested to hear from anyone else with similar experiences
James
Alex
June 2, 2015 at 7:51pmHi! I tried with SUCCESS and connected to a premier 816 . Simple and clean job!
(I used a very cheep USB to TTL adapter)
Anuwat
August 31, 2015 at 9:13amAlex .help me ,I’m try to connect premier 832 ,but i can not
Alex
January 5, 2016 at 5:15amHi my friend I’ve just seen your post (!) Have you solved your ptoblem yet?
Alex
David Wallis
November 19, 2015 at 10:38pmhave you done any snooping on the protocol used to the keypads and expanders, or do you know what is uesd? ttl, 232, 485?
James Reed
December 8, 2015 at 7:05pmHave you seen the latest v3.00 firmware upgrade? One of things it does is enable a third com port using the communications header. You have to buy a breakout board but I’m sure it is just a simple pin to pin connection. We’ll need to work out the pinout for that too.
jfelectronics
January 9, 2016 at 6:02pmGeneral question: Why are there no *-W panels listed in the account settings. Whatever I set it to (my panel is a 12-W LIVE) the Ricochet button is greyed out.
mahesh
February 18, 2016 at 1:09pmhey guys im doing the same with COMIP pls help me in this
Kris
December 22, 2016 at 10:41pmGreat post. I am looking in ways for cheaper ”version” of ComGSM Texecom has. Any ideas?
I guess it needs to be some sort of modem M2M GSM to RS232 or I am wrong!
Miles
September 10, 2017 at 8:15pmHi,
This post is really interesting and useful – I’m just about to try and connect my texecom alarm to the lan following this and a few other articles. There’s one thing that’s confusing me – the 5 pin molex connector out of the texecom board, I’m totally confused what to buy to connect to it. Can you tell me/link me what’s suitable? If I look for connectors on google/ebay the range is just baffling me and i’m certain it’ll take me 20 attempts to get the right one!
Help much appreciated
Michael
February 16, 2018 at 7:49amWould be interested in hearing from anyone who can figure out a way to connect to the panel with a download lead without knowing the UDL code. There must be a way, a Backdoor method as such. I know with a keypad, you only get so many attempts to input the correct code but if there was no Backdoor I’m thinking a simple macro could be implemented to quickly try all code combinations from 0001 to 999999. Any ideas?
Juan Pablo Barrio
March 20, 2019 at 9:53pmHola Miguel lograste entrar sin el Code UDL ?? Yo tampoco lo tengo
Warren
May 1, 2019 at 10:07amDid you ever figure this out? I too am looking for a way into panels with locked engineer codes. I was considering reading the NVM direct and can read the memory on a Veritas no problem but can not replicate this on the Premier Elite range. I have heard there is a way to unlock the engineer code but have been unable to fathom this too. Any pointers?
David Parr
April 13, 2018 at 9:16pmUsed a Lead from Aliexpress for £2.32 and it works on the Premier Elite 64-Wireless kit 0002
https://www.aliexpress.com/item/6Pin-FTDI-FT232RL-FT232-Module-For-Arduino-USB-to-TTL-UART-Serial-Wire-Adapter-RS232-Download/32847308062.html
Warwick
October 15, 2018 at 8:53amHi
I’m hoping as a hardware hacker you might know the answer to this. On the same lines as Michaels post above, are you aware of any way to circumvent a locked engineer code on the Texecom Premier Elite panels. I’ve had a quick poke around but can not figure out a method, I’m sure there must be a way.
Also, for some reason I am unable to directly read the NVM chips on the panel via a USB reader as I was hoping for a way to find a code or even erase the chip completely. They all seem to use the Microchip 24LC chips which I think store the codes and the datasheet shows there is a write protect pin but from my testing it doesn’t appear that this is what they are using to lock the NVM.
Regards, Warwick
Leo
January 12, 2019 at 1:19pmThanks for the blog. really useful in connecting to and then brute-forcing my own textecom premier elite. https://www.leocrawford.org.uk/2019/01/10/brute-forcing-my-own-texecom-premier-elite.html
David
June 11, 2020 at 2:30pmHi Leo, any chance you can share your code in full?
Vaughan
February 4, 2019 at 1:38pmThis ‘hack’ was particularly useful – I used the FTDI board to connect an 816 via USB and its brilliant.
I’d be very curious if you happen to know the internal settings of the COMIP module which effectively converts the three wire RS232 to Ethernet.
Vaughan
Johannesburg, SA