There are a number of sensors that can be used to monitor temperature using a microcontroller. RTDs, thermistors, LM35s, thermocouples and so on. These are all analog output sensors, and this introduces a few problems:
- You need to use a single analog input (ADC) for each temperature sensor, and this might also include additional buffer/amplifier circuitry, Wheatstone bridges or horrible stuff like cold junction compensation on thermocouples. ADCs also tend to be power hungry and slow in small microcontrollers.
- Each sensor needs it’s own cable running back to the microcontroller.
- As cable runs increase in length, you end up with all sorts of nasty analog issues like voltage drop, noise, etc.
There is a way to avoid these issues – using digital temperature sensors like the Dallas DS18B20. These solve the above problems.
- You only need to use a small number of digital IOs to interface to the sensors (either directly, or via a bridge chip). This can be as little as a single pin.
- Tens or hundreds of sensors can be on the same bus, massively reducing the number of inputs used, and simplifying cabling especially when you are reading more than a few sensors.
- Driving a bus digitally is much easier than reading analog values. Many of the bridge chips have quite advanced features to deal with the analog gubbins (slew rate control, power active pull-ups etc.)
It’s for these reasons that I much prefer using DS18B20 sensors when I can. They do have some disadvantages though:
- They are slow to respond and slow to read. With 9-bit precision, a reading takes at least 100ms. At 12-bit this increases to 750ms. You can sleep your microcontroller during this period, so this is more a latency than a power issue.
- They have a narrow temperature range compared to a lot of sensors – only -55degC to 125degC. But this is more than enough for domestic heating flow/return and ambient air temperatures.
- They are costly – about £4 a go through big suppliers (though closer to £1 if you buy 10 on eBay), possibly offset by other advantages like less circuitry and cabling.
- They are only readily available in the bare TO-92 package. There are waterproof versions, there are stainless steel pocketed versions, but they are much harder to find than PT100 waterproof sensors.
In balance though, I feel they are ideal for this project.
Previously I have driven the DS18B20 sensors directly off a pin on the Arduino, bit-banging the 1-Wire protocol using the excellent 1-Wire and DallasTemperature libraries. This works – mostly. However, as soon as cable runs get longer or network topologies get non-ideal, you start getting errors – the dreaded 85degC readings.
The Raspberry Pi has far weaker IO drive than the Arduino (16mA per pin vs 40mA on an ATmega328), and is far less resilient to ESD and mishandling. I was really concerned that directly using an IO pin in a real world application would cause problems, so started looking for a add-on driver board. I quickly found the Sheepwalk Electronics RPI2 I2c to 1-Wire bridge. This is a small plug-on board, with a DS2482-100 1-Wire master, PCA9306 I2C voltage level converter, and a DS9503 1-Wire ESD protection IC. This takes the hard work out of doing 1-Wire, and is supported by lots of software. I also ordered a passive hub and a number of RJ45 connected DS18B20 sensors.
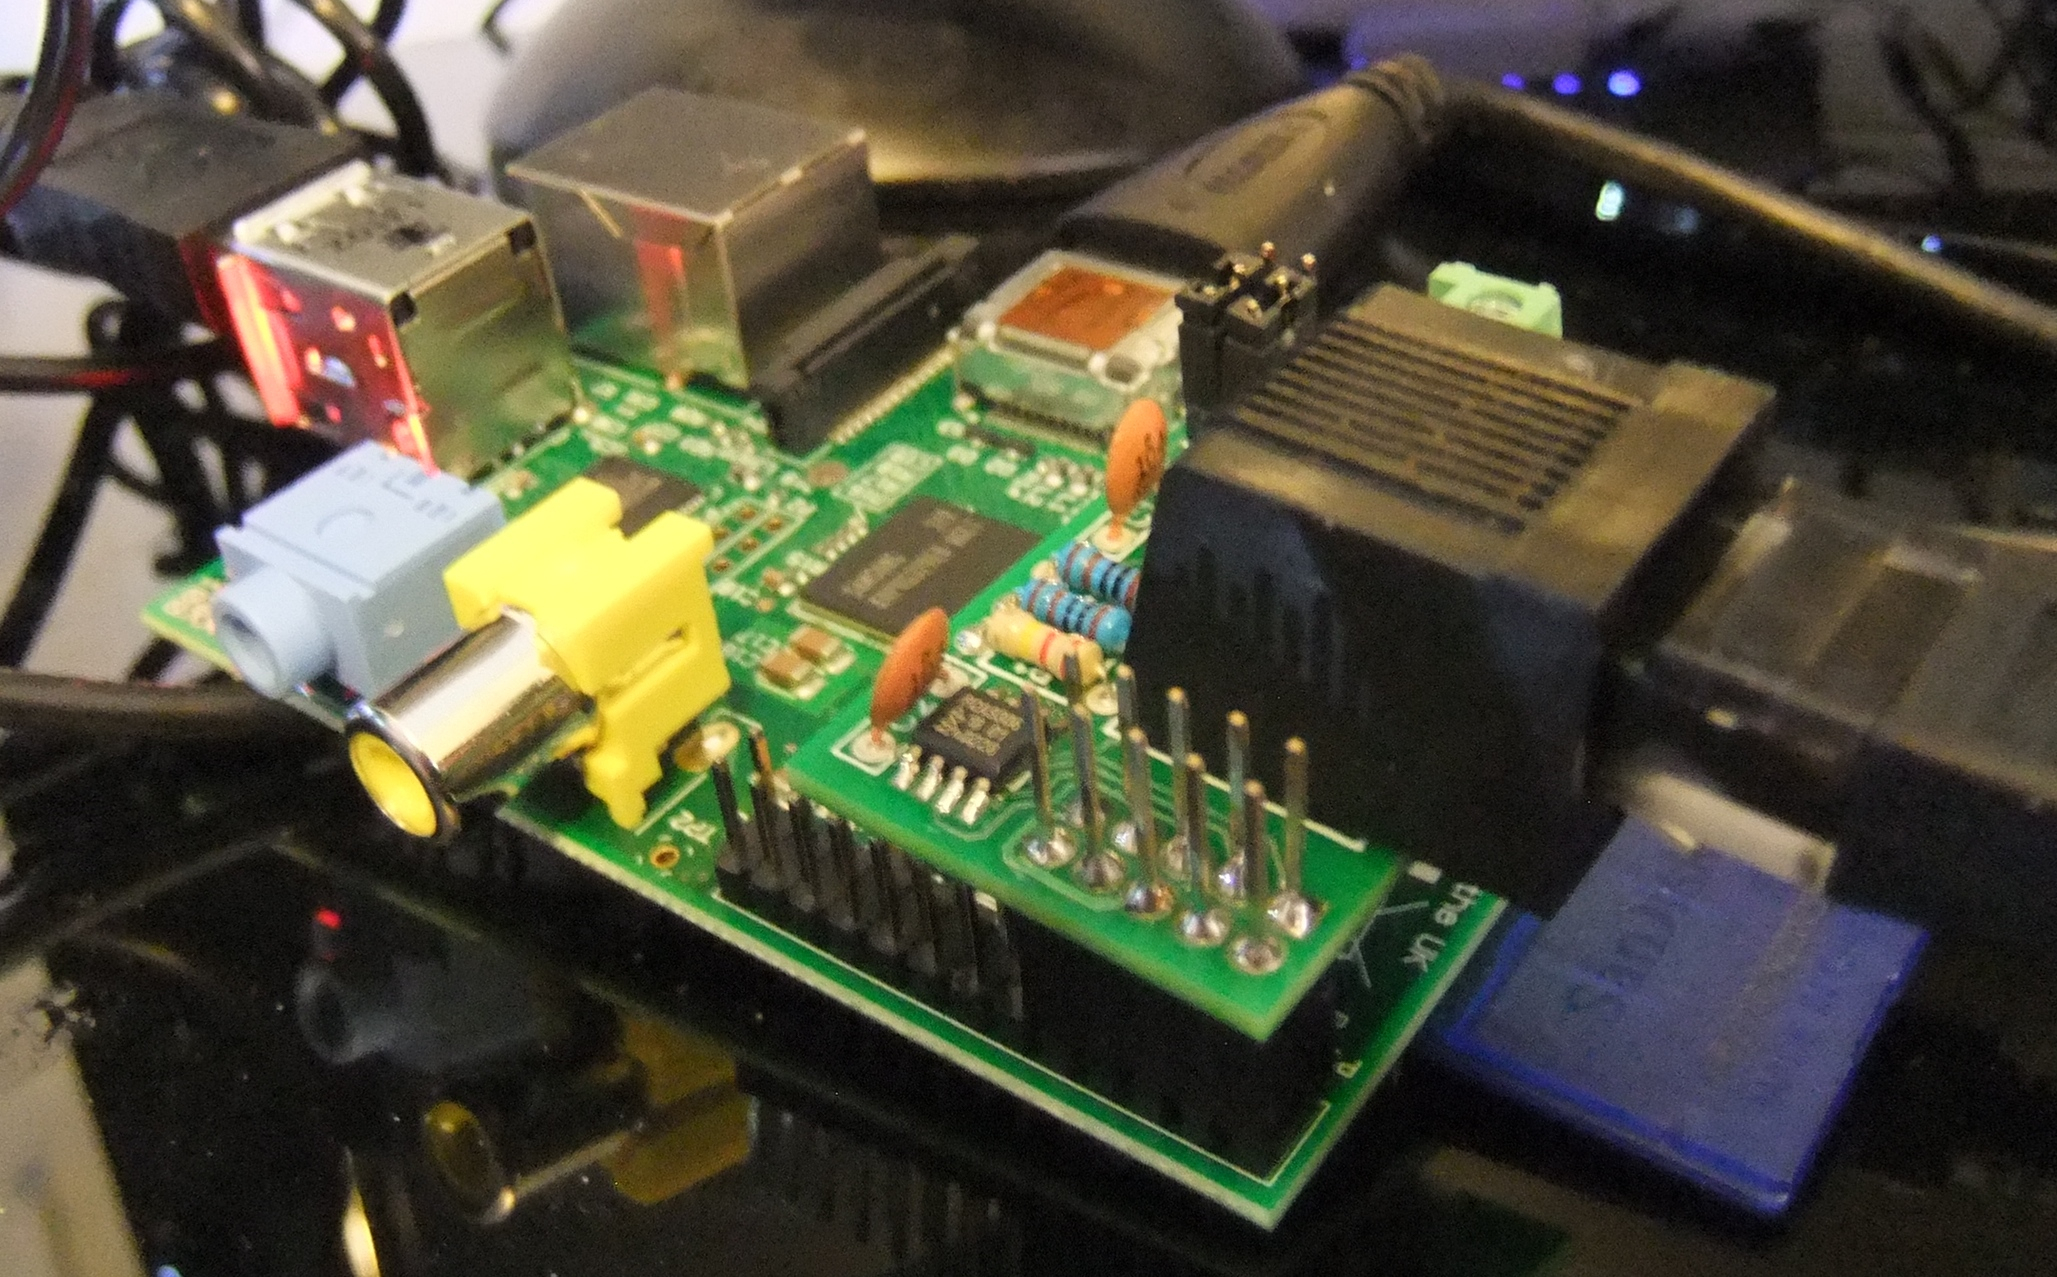
The I2C->1-Wire bridge
So, how do we get these working with a Raspberry Pi?
Make sure you can communicate with the I2C device
The I2C module is blacklisted by default on Raspbian. You need to edit a file to stop this happening by removing it from the mod probe blacklist file:
sudo nano /etc/modprobe.d/raspi-blacklist.conf
and comment out the line with a hash.
blacklist i2c-bcm2708
You also need to make sure the i2c-dev module is loaded. This isn’t dev=development but dev=/dev i.e. access the i2c device via /dev. To do this, edit modules.conf:
sudo nano /etc/modules
And add the line
i2c-dev
right at the end.
You can now either restart, or issue the following commands to make sure the modules are loaded:
sudo modprobe i2c-bcm2708
sudo modprobe i2c-dev
And you can confirm they have loaded using:
pi@raspberrypi2 ~ $ lsmod | grep i2c
i2c_dev                 5557  0
regmap_i2c              1645  1 snd_soc_core
i2c_bcm2708             3949  0
pi@raspberrypi2 ~ $
We’re good to start communicating with the DS2482-100 bridge chip now, and to do so, we are going to use i2cdetect, which is part of the i2ctools package. Issue the following command to install this
sudo apt-get update && sudo apt-get install i2c-tools
Now run i2cdetect:
pi@raspberrypi2 ~ $ sudo i2cdetect -y 1
     0  1  2  3  4  5  6  7  8  9  a  b  c  d  e  f
00:          -- -- -- -- -- -- -- -- -- -- -- -- --
10: -- -- -- -- -- -- -- -- 18 -- -- -- -- -- -- --
20: -- -- -- -- -- -- -- -- -- -- -- -- -- -- -- --
30: -- -- -- -- -- -- -- -- -- -- -- -- -- -- -- --
40: -- -- -- -- -- -- -- -- -- -- -- -- -- -- -- --
50: -- -- -- -- -- -- -- -- -- -- -- -- -- -- -- --
60: -- -- -- -- -- -- -- -- -- -- -- -- -- -- -- --
70: -- -- -- -- -- -- -- --
pi@raspberrypi2 ~ $
This shows the device at i2c address 18 – you can alter this to another value using some jumpers on the RPI2 board. You can see my i2c bus isn’t exactly jam packed, so we will stick with 18.
Communicate with the 1-Wire bridge
Now we need to communicate with the 1-Wire bridge. There are a number of pieces of software that can do this, but for simple temperature monitoring, OWFS (1-Wire file system) seems popular.
The standard package available from normal repos is 2.8p15, and the latest code is 2.9p1. There are enough changes that I wanted to build from scratch.
There are a few bits and pieces that need installing for this to work on the default Raspbian install.
sudo apt-get install python2.7-dev libfuse-dev swig
This won’t build PHP etc. libraries for OWFS but I am not very likely to be using PHP.
Next we need to get the source and unpack it.
wget -O owfs-latest.tgz http://sourceforge.net/projects/owfs/files/latest/download
sudo tar zxvf owfs-latest.tgz -C /usr/src
Then we need to configure:
cd /usr/src/owfs-2.9p1
sudo ./configure
You need to make sure this confirms that it will build with the options you need.
Current configuration:

    Deployment location: /opt/owfs

Compile-time options:
                      USB is DISABLED
                      I2C is enabled
                       W1 is enabled
    Parallel port DS1410E is enabled
         Zeroconf/Bonjour is enabled
             Debug-output is enabled
                Profiling is DISABLED
Tracing memory allocation is DISABLED
1wire bus traffic reports is DISABLED

Module configuration:
                    owlib is enabled
                  owshell is enabled
                     owfs is enabled
                  owhttpd is enabled
                   owftpd is enabled
                 owserver is enabled
               owexternal is enabled
                    ownet is enabled
                 ownetlib is enabled
                    owtap is enabled
                    owmon is enabled
                   owcapi is enabled
                     swig is enabled
                   owperl is enabled
                    owphp is DISABLED
                 owpython is enabled
                    owtcl is DISABLED

pi@raspberrypi2 /usr/src/owfs-2.9p1 $
You need i2c and owfs support in there for what we are doing.
Now you need to build and install, expect this to take a long time on the Pi (30-60m):
sudo make && sudo make install
owfs allows us to access the i2c devices using the file system. To set this up, first create a directory for the devices to show up in:
sudo mkdir /mnt/1wire
owfs uses something called fuse to allow it to create the filesystem representing the 1-Wire bus and devices. I don’t fully understand what it does, but you need to change one of the options by editing fuse.conf:
sudo nano /etc/fuse.conf
and then uncomment this line by removing the #:
#user_allow_conf
And last, at least for this part, we are going to start owfs manually and check that everything is working:
sudo /opt/owfs/bin/owfs --i2c=ALL:ALL --allow_other /mnt/1wire/
This starts owfs, looking at all available i2c bus masters, and mounts the result in /mnt/1wire. So we take a look in /mnt/1wire
pi@raspberrypi2 ~ $ cd /mnt/1wire
pi@raspberrypi2 /mnt/1wire $ ls
28.33F749050000  28.79774A050000  28.EDEE49050000  bus.0     simultaneous  structure  uncached
28.3474A3040000  28.DB564A050000  alarm            settings  statistics    system
pi@raspberrypi2 /mnt/1wire $
The directories starting 28. are the temperature sensors. Four connected to the hub and one on the hub itself. The other directories and files control settings and provide information about the bus and communication.
Now we can read the ttemperature off all of the sensors:
pi@raspberrypi2 /mnt/1wire $ cat 28.*/temperature
       17.25     17.1875      17.625      17.375      17.125
Yes, our front room is that cold. I broke the heating last night.

The passive hub with additional DS18B20 sensor
In the next part I am going to get owfs starting automatically with the Pi and then read the sensors in a simple Python program.
Loren Amelang
May 26, 2014 at 7:35pmHave you run any DS18B20 chips on 3.3V? I’m playing with a BBB and direct I/O using the same “server: w1” the rPi uses. Sensors on my old 5V system exactly match my best thermometer. Move the same sensors to the 3.3V BBB and they read temperatures, but high. Of the ones I’ve tried, one reads about 2C high, one about 6C high. I’ve verified the displayed outputs are correct for the raw sensor data on both systems. I didn’t expect to use the direct interface for the real system with sensors all over the house, but I’m surprised it gives incorrect results. Guess there is some analog stuff inside the 18B20?