John Matherly, of Shodan fame, posted a blog to /r/netsec (comments are relatively interesting) last week showing how he had used the Shodan Python API combined with “facets” to find the most common SSH fingerprints.
I’m a heavy user of Shodan, but largely via the web front-end. I thought I’d take this as an opportunity to get the API working. It’s very easy. All instructions are under Ubuntu 14.04, but will likely work for any Ubuntu like distro.
First make sure you have easy_install which is part of setuptools – you will likely have this already if you have built anything big in Python:
sudo apt-get install python-setuptools
Next, install the Shodan API itself:
easy_install shodan
Simple – we should be done now.
You need to sign up to Shodan and get an API key. If you use Shodan regularly, I would suggest getting a paid-for plan (it’s very good value), but a free account will have access to the API, albeit with limitations.
Let’s test it with a simple search first:
import shodan

SHODAN_API_KEY = "dontbeusingmykey"

api = shodan.Shodan(SHODAN_API_KEY)

try:
    results = api.search('port:22 country:GB')

    print 'Results found: %s' % results['total']
    for result in results['matches']:
        print 'IP: %s' % result['ip_str']
        print result['data']
        print ''
except shodan.APIError, e:
    print 'Error: %s' % e
This should throw a huge list of results back for any hosts in the UK (country code GB which I always forget) with port 22 open:
IP: 83.105.125.97
SSH-2.0-Cisco-1.25
Key type: ssh-rsa
Key: AAAAB3NzaC1yc2EAAAADAQABAAABAQCyV7QrX9EwBrRsQBeRE4gryZldmUwHSz9PCJtcaaw4y8sm
facMlgxnMNQ2KyaEpOmDVBaNgqWFD8ekalnci84G1AvZgWJ4rHIcixMouNecbbZrmdMSPxG6FSS8
paNLANBaiLuAeBI2RSk+XD4DKxKRGlJO9FG18VrKkh/t1pbV2gxW3hu9PQkirrvZkhwk9RHVW10M
8hdpXtWlM3BrR5tI/pyWk1B6/ucRR6DzQHevtDLL+BjBVwRp0gIh7t352ciCD+CwSsjCb9hZh8w/
9yp38WDcYUPT2loDFQHJxsNTxIa3PsiIJZirBrNAbDGIl7bRAXti4iWYDcqLEN1FQEZh
Fingerprint: 4c:39:7e:bc:38:b3:22:53:4a:a0:81:29:04:9c:03:35

IP: 178.62.189.135
SSH-2.0-OpenSSH_5.3
Key type: ssh-rsa
Key: AAAAB3NzaC1yc2EAAAADAQABAAABAQC/ElKK7fznlds8OTx2i9m7IOjSFaKbaSlbKpLc9lCuSkH/
YjHNwZb+vRihYULvDoTIfusCLjzOLYNp49zBplv/Jbkyy3AIUq0QzMmjZmFTuKO05BZGTTmH9jol
aFKjLliN5T//Z3q83S4p6+3xTvvpWyk6RkeisbrjxzFNdWuGdTMAN21/vgsgofi79tvjomiC7PuA
7pZn8l2hOJaG1F17NHhyURV7pgClHx+01H/ZSFXVL8MMF5mhku7Uf10JylSbAWDZntWQZx8YFW1d
ABGrdzhDmCR9OH87WCKkgY5NtcwQDp8z59LBHvu1oQp22RJDrca8+V2b5fOjbSMhColh
Fingerprint: 7d:3b:18:9d:00:54:2f:44:4e:5a:cc:07:b9:2c:1e:d3
Now this is interesting and useful, but Shodan has a very neat bit of functionality called “facets”. The simplest way of explaining these is that it allows me to group the results and show you the top by count.
For example, we could find the top ports open across the UK:
import shodan

SHODAN_API_KEY = "jesustakethewheel"

api = shodan.Shodan(SHODAN_API_KEY)

try:

    results = api.count('country:GB', facets=[('port', 10)])

    for facet in results['facets']['port']:
        print '%s -- %s' % (facet['value'], facet['count'])

except shodan.APIError, e:
    print 'Error: %s' % e
Which gives us the following results:
7547 -- 2519825
80 -- 1816315
443 -- 1051424
22 -- 506137
5060 -- 499811
1723 -- 423132
25 -- 382716
8080 -- 351585
500 -- 242772
21 -- 241357
As expected, we have the common ports of 80 (http), 443 (https), 22 (ssh), 25 (SMTP), 8080 (http or http proxy), and 21 (telnet). What’s the top port 7547 though?
This is TR-069 or CWMP (CPE WAN management protocol), a http based protocol that allows the remote management of customer premises equipment i.e. lets your ISP remotely control your router. It’s open on a worryingly large number of routers and suffers from a number of vulnerabilities, most notably the “Misfortune Cookie“.
Anyway, facets also let us group by more esoteric fields, such as the SSH fingerprint presented each time you try to connect via SSH. This is the focus of John’s blog post.
import shodan

SHODAN_API_KEY = "hesapiratehesaftermybooty"

api = shodan.Shodan(SHODAN_API_KEY)

try:

    results = api.count('port:22 country:GB', facets=[('ssh.fingerprint', 10)])

    for facet in results['facets']['ssh.fingerprint']:
        print '%s -- %s' % (facet['value'], facet['count'])

except shodan.APIError, e:
    print 'Error: %s' % e
I’ve restricted this to the UK – I know the lay of the land better, and dealing with any issues found is a little easier both from a communication and legal standpoint.
The results are as follows:
7c:a8:25:21:13:a2:eb:00:a6:c1:76:ca:6b:48:6e:bf -- 11758
a8:99:c2:92:08:fb:5e:de:4b:96:14:de:61:df:ad:6d -- 7990
03:56:e6:52:ee:d2:da:f0:73:b5:df:3d:09:08:54:b7 -- 2239
b4:af:64:0c:9a:ed:ed:4d:b1:c0:12:5d:c9:e4:c8:f0 -- 1217
eb:65:52:6e:40:28:af:a6:36:5b:b3:b4:0c:5d:32:3d -- 1091
39:aa:e4:e9:a2:e7:c1:04:9d:00:9f:b6:99:d5:9c:bd -- 880
57:94:42:63:a1:91:0b:58:a6:33:cb:db:fe:b5:83:38 -- 782
34:47:0f:e9:1a:c2:eb:56:eb:cc:58:59:3a:02:80:b6 -- 630
14:96:82:72:6f:bc:a5:14:53:1c:72:71:0d:8b:cb:c2 -- 598
f9:76:13:e7:86:11:8b:64:0f:e0:39:ea:e9:14:a7:18 -- 471
Those top three are very, very common! How has this happened?
Let’s plug the top one back into Shodan via the web front-end:
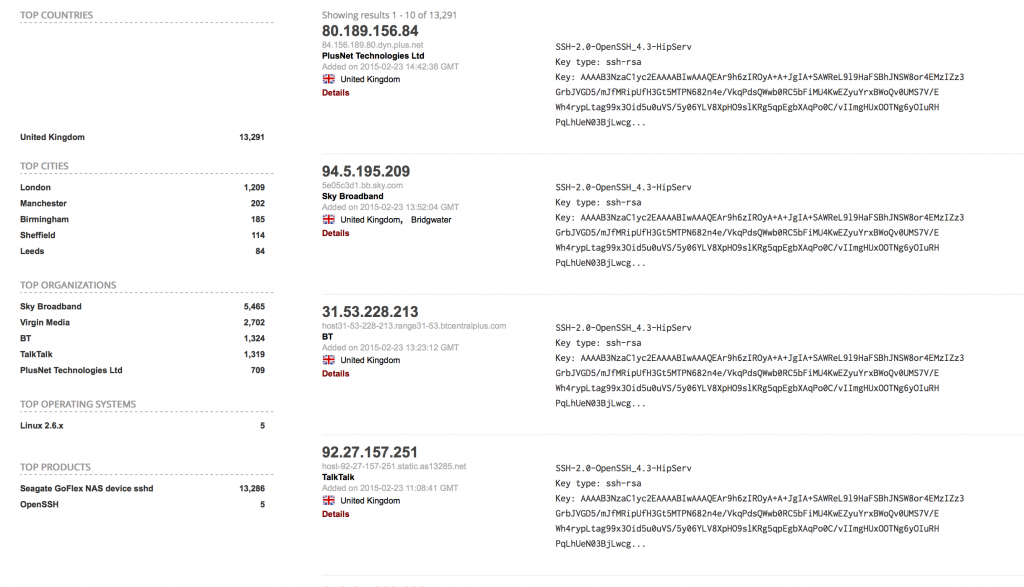
What can we tell from those organisations and hostnames? These are all devices on consumer broadband connections. Routers, NAS, other devices with SSH open.
So what is the issue here? Why are these duplicate SSH fingerprints an issue?
The SSH fingerprint is a hash of the public key used by the router for SSH communication. It provides a human-readable way of checking that you are connecting to the host you are expecting to connect to. If it has a different public key, you should nearly always get a different fingerprint.
SSH keys should be unique per device. The first time they boot, they should use a source of entropy to generate unique keys. The reason so many devices have the same keys is that the keys are stored in firmware and are not changed.
Having the same fingerprint means it is no longer possible for you to authenticate the device you are connecting to. Is it your router, or another person with the same router? Who knows!
It also, worryingly, means that there is a private key that could be used to impersonate and possibly even access these devices. This key may be stored in the firmware of these devices and recovered. This has happened in the real-world.
It is worthwhile noting, that even with the public/private keypair, you still need to MITM a SSH conversation to be able to decrypt it. SSH uses Diffie-Hellmann key exchange to ensure Perfect Forward Secrecy. The session keys are forgotten and the conversation can never be decrypted.
But above all, the biggest question is why is SSH open on so many broadband connections? Routers shouldn’t have SSH open like this. If they are NAS or similar behind the router and using UPnP to forward ports, why are routers still allowing this? If SSH is open by default, it would suggest that there is at least one account that can login by default. If the SSH keys are the same across all devices, how are we to know that the login credentials differ from device to device?
